Model Of A Animal Cell With Labels
Juapaving
Mar 30, 2025 · 6 min read
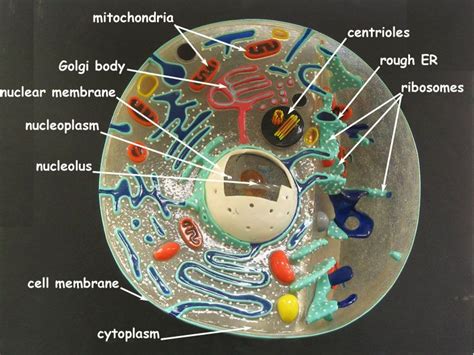
Table of Contents
Building a Stunning Animal Cell Model: A Comprehensive Guide with Labels
Creating an animal cell model is a fantastic way to visualize the intricate machinery of life. Whether you're a student, teacher, or simply curious about biology, this detailed guide will walk you through building a captivating and informative model, complete with accurate labels. We'll cover everything from choosing the right materials to mastering the labeling techniques for a truly impressive display.
I. Understanding the Animal Cell: Key Components
Before diving into the construction, let's revisit the key organelles found within an animal cell. Accurate representation of these is crucial for a successful model.
A. The Cell Membrane: The Protective Barrier
The cell membrane, or plasma membrane, is the outermost boundary of the animal cell. Think of it as the cell's skin, selectively permeable, allowing certain substances to enter and exit while keeping others out. In your model, represent it as a flexible, thin layer, perhaps using clear plastic wrap or cellophane. Label it clearly: "Cell Membrane."
B. The Nucleus: The Control Center
The nucleus is the cell's control center, containing the genetic material (DNA) organized into chromosomes. It dictates the cell's activities and directs protein synthesis. Represent this as a large, central sphere, perhaps using a ping pong ball or a similarly sized, appropriately colored sphere. Label it: "Nucleus." Within the nucleus, you can also depict the nucleolus, a smaller, denser region where ribosomes are assembled. Label this smaller sphere: "Nucleolus."
C. Cytoplasm: The Internal Environment
The cytoplasm is the jelly-like substance filling the space between the cell membrane and the nucleus. It's a dynamic environment where many cellular processes occur. Represent this with a translucent material like clear gelatin or even a clear plastic bag filled with water. Label the area within the cell membrane but outside the nucleus: "Cytoplasm."
D. Mitochondria: The Powerhouses
Mitochondria are the energy powerhouses of the cell, converting nutrients into adenosine triphosphate (ATP), the cell's primary energy currency. Depict these as bean-shaped structures using small, oblong objects. Their color should be distinct, perhaps red or dark brown. Label several: "Mitochondria."
E. Ribosomes: Protein Factories
Ribosomes are tiny structures responsible for protein synthesis. They're found freely in the cytoplasm or attached to the endoplasmic reticulum. Represent these as small dots scattered throughout the cytoplasm and on the endoplasmic reticulum (explained below). Label a cluster: "Ribosomes."
F. Endoplasmic Reticulum (ER): The Transportation Network
The endoplasmic reticulum (ER) is a network of interconnected membranes involved in protein and lipid synthesis and transport. There are two types: rough ER, studded with ribosomes, and smooth ER, lacking ribosomes. Represent the ER using twisted strips of different colored materials (rough ER could have small dots attached to represent ribosomes). Label both: "Rough ER" and "Smooth ER."
G. Golgi Apparatus: The Packaging and Shipping Center
The Golgi apparatus (or Golgi complex) is responsible for modifying, sorting, and packaging proteins and lipids for secretion or transport within the cell. It’s often depicted as a stack of flattened sacs. Use stacked, slightly curved pieces of cardboard or other material. Label it: "Golgi Apparatus."
H. Lysosomes: The Recycling Centers
Lysosomes are membrane-bound organelles containing digestive enzymes that break down waste materials and cellular debris. Represent these as small, oval-shaped containers using appropriately sized beads or small plastic containers. Label them: "Lysosomes."
I. Vacuoles: Storage Units
Vacuoles are membrane-bound sacs that store water, nutrients, and waste products. In animal cells, they are generally smaller than those in plant cells. Use small, clear balloons or plastic bags to represent them. Label them: "Vacuoles."
J. Centrosomes and Centrioles: Essential for Cell Division
Centrosomes, which contain centrioles, are crucial for cell division. These are usually found near the nucleus and organize microtubules during mitosis. Represent these as small cylindrical structures near the nucleus. Label: "Centrosomes" and "Centrioles."
II. Materials for Your Animal Cell Model
The materials you choose significantly impact the model's visual appeal and durability. Consider the following options:
- Base: A sturdy Styrofoam ball (for a 3D model) or a large piece of cardboard (for a 2D model)
- Organelles: Ping pong balls, beads, marbles, small containers, plastic tubes, construction paper, felt, etc. Choose materials in contrasting colors for clarity.
- Cell Membrane: Clear plastic wrap, cellophane, or a flexible, transparent sheet.
- Cytoplasm: Clear gelatin, water in a clear bag, or a clear coating.
- Adhesives: Glue, hot glue, or double-sided tape.
- Labels: Small pieces of paper, labels from a label maker, or even carefully written labels using a fine-tipped marker.
III. Building Your Animal Cell Model: A Step-by-Step Guide
Step 1: Prepare the Base. If using a Styrofoam ball, this is your base. If using a 2D model, carefully plan the layout of your organelles on the cardboard.
Step 2: Create the Nucleus. Attach your chosen material for the nucleus to the base, ensuring it's centrally located. Add the nucleolus within the nucleus.
Step 3: Construct the Organelles. Using your chosen materials, construct the remaining organelles (mitochondria, ribosomes, ER, Golgi apparatus, lysosomes, vacuoles, centrosomes and centrioles).
Step 4: Assemble the Model. Carefully attach the organelles to the base, ensuring they are accurately positioned relative to each other and the nucleus.
Step 5: Add the Cytoplasm. Fill the space between the organelles and the cell membrane with your chosen cytoplasm material.
Step 6: Create the Cell Membrane. Carefully wrap your chosen membrane material around the entire structure, securing it at the base.
Step 7: Label Your Model. Using your chosen method, carefully label each organelle, ensuring the labels are clear, accurate, and easy to read. You can use arrows to connect labels to specific organelles.
IV. Advanced Techniques for Enhanced Visual Appeal
For a truly exceptional model, consider these advanced techniques:
- Detailed Organelle Structures: Instead of simple shapes, create more realistic representations of organelles. For example, use tiny beads or other materials to add detail to the mitochondria's cristae (inner folds).
- Cross-Section View: Create a model that showcases a cross-section of the cell, revealing the internal structures in detail.
- Interactive Elements: Include pop-up descriptions or additional information about each organelle.
- 3D Printing: For high-precision models, explore 3D printing techniques to produce complex and detailed organelles.
- Digital Model: Create a virtual 3D animal cell model using digital modeling software.
V. Tips for Success
- Research: Thoroughly research the structure and function of each organelle before beginning your model.
- Planning: Sketch out your design before beginning construction.
- Accuracy: Strive for accurate representation of the size and shape of each organelle relative to the others.
- Clarity: Use contrasting colors to make each organelle easily distinguishable.
- Presentation: Present your model neatly and professionally. Consider adding a written description or a small poster with additional information.
VI. Conclusion: A Powerful Learning Tool
Creating an animal cell model is more than just a craft project; it's a powerful learning experience. By engaging in the process of building and labeling your model, you'll gain a deeper understanding of the complex organization and function of the animal cell. Remember to showcase your creation proudly – it's a testament to your hard work and a striking visual representation of the wonders of cellular biology. Good luck, and have fun building!
Latest Posts
Latest Posts
-
Find The Inverse Of The Relation
Apr 01, 2025
-
How Are Cellular Respiration And Photosynthesis Related
Apr 01, 2025
-
How Many Rna Polymerases Are Found In Prokaryotes
Apr 01, 2025
-
When Two Parallel Lines Are Crossed By A Transversal
Apr 01, 2025
-
Device That Converts Light Energy Into Electrical Energy
Apr 01, 2025
Related Post
Thank you for visiting our website which covers about Model Of A Animal Cell With Labels . We hope the information provided has been useful to you. Feel free to contact us if you have any questions or need further assistance. See you next time and don't miss to bookmark.
