A To Z In Cursive Writing
Juapaving
Mar 31, 2025 · 7 min read
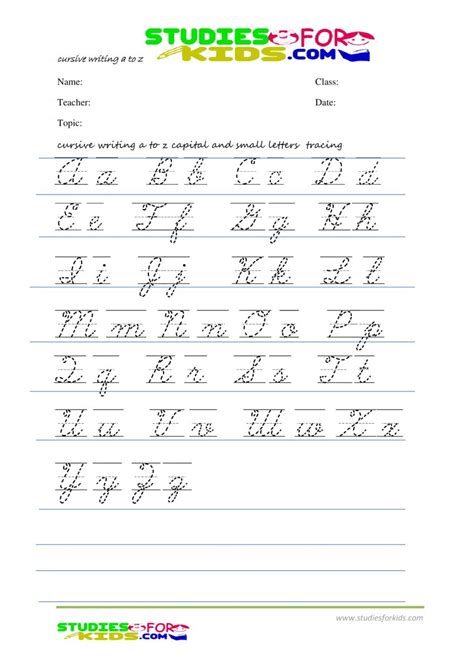
Table of Contents
A to Z in Cursive Writing: A Comprehensive Guide to Mastering the Art
Cursive writing, also known as script handwriting, is a beautiful and efficient way to write. While typing has become the dominant form of writing in the digital age, mastering cursive remains a valuable skill, offering benefits in speed, style, and personal expression. This comprehensive guide will take you through the alphabet, offering tips and tricks for writing each letter elegantly and consistently. We'll delve into the fundamentals of cursive formation, stroke order, and connecting letters smoothly, ultimately helping you develop a flowing and readable cursive script.
Understanding the Fundamentals of Cursive Handwriting
Before we dive into the individual letters, it's crucial to understand the foundational elements of cursive writing. These elements, when mastered, form the basis for a legible and aesthetically pleasing script.
1. Posture and Grip: The Foundation of Good Cursive
Maintaining proper posture and a comfortable grip is essential for preventing fatigue and ensuring consistent letter formation. Sit upright with your feet flat on the floor and your paper angled slightly. Hold your pen or pencil loosely, using a tripod grip (holding the pen with your thumb, index finger, and middle finger). Avoid gripping too tightly, as this can lead to cramping and uneven strokes.
2. Stroke Order: The Key to Consistency
The order in which you make the strokes for each letter is crucial for consistency and speed. Following a consistent stroke order helps you develop muscle memory, resulting in a more fluid and natural writing style. We'll cover the recommended stroke order for each letter in the sections below.
3. Connecting Letters: The Essence of Cursive
Cursive writing is defined by its connected letters. Smoothly connecting letters together is key to achieving a flowing script. Practice transitioning between letters, focusing on creating consistent connections without lifting your pen unnecessarily. This fluidity adds elegance and efficiency to your writing.
Mastering the Cursive Alphabet: A Letter-by-Letter Guide
Now, let's embark on a journey through the cursive alphabet, dissecting each letter's formation and providing practical tips for improvement.
A: The Ascender
The cursive 'A' begins with a slight upward curve, forming the top loop. Then, a downward stroke creates the central stem, followed by a short, curved stroke connecting to the bottom loop. Focus on the consistent size and shape of the loops.
B: The Rounded Beginning
The cursive 'B' starts with a large loop, mirroring the shape of the printed letter's curve. Then, a downward stroke follows, culminating in a small loop at the base. Pay attention to maintaining the same size and shape for the initial loop across all 'B's.
C: The Gentle Curve
The cursive 'C' is a simple, continuous curve. Practice maintaining a consistent size and roundness. Avoid making it too narrow or too wide.
D: A Variation on C
Similar to 'C', the cursive 'D' begins with a curve but extends into a downward stem. The stroke order is crucial here – start with the curve, then complete the stem. Maintaining a consistent angle is key to uniformity.
E: The Ascending Curve
The cursive 'E' combines an initial curved stroke with a downward stem and a final upward stroke. Keep the initial curve and final stroke consistent in size and shape.
F: The Ascender
The cursive 'F' is essentially an extended 'E'. It starts with a similar upward curve, then forms a long vertical stem. Focus on the proportion of the upward curve to the stem.
G: Looping at the Bottom
The cursive 'G' starts with a loop, followed by a downward stem which connects to a small counterclockwise loop at the bottom. Practice connecting the stem and loop smoothly without breaks.
H: Two Verticals
The cursive 'H' consists of two vertical strokes connected by a short, horizontal stroke. Keep the vertical strokes parallel and consistently spaced.
I: The Dotted I
The cursive 'I' is a simple vertical stroke. Remember to add the dot above. Focus on the consistency of the vertical stroke's height and width.
J: A Hooked Ending
The cursive 'J' is similar to an 'I' but includes a curved base and a small hook. Practice making the hook consistently sized.
K: The Angular Connection
The cursive 'K' combines a vertical stroke with two angled strokes, one slanting upwards and another downwards. Pay attention to the angles and consistency of the strokes.
L: The Simple Vertical
The cursive 'L' is a vertical stroke that extends slightly below the baseline. Maintaining a consistent height and straightness is crucial.
M: The Double Hump
The cursive 'M' involves two humps connected by a short vertical stroke. Maintain consistent heights for each hump and even spacing between them.
N: The Single Hump
The cursive 'N' is very similar to 'M', but only has one hump. Pay attention to the slope and uniformity of the hump.
O: The Closed Circle
The cursive 'O' is a continuous closed circle. Practice making it perfectly round and consistent in size.
P: A Loop Above
The cursive 'P' begins with an upward loop, followed by a short downward stroke. Pay attention to the consistent size of the upper loop and the slope of the downward stroke.
Q: The Tailored Ending
The cursive 'Q' begins similar to 'O', but extends downward with a tail that curves slightly to the right. Pay attention to the consistent sizing of the initial circle and the smoothness of the tail.
R: A Swish at the End
The cursive 'R' is similar to the 'P', but adds a small curl at the end of the downward stroke. Practice making the curl consistently sized and shaped.
S: A Gentle Curve
The cursive 'S' is a continuous, flowing curve that resembles a lower-case 's' in many styles. Focus on maintaining a consistent flow and shape.
T: A Cross Above
The cursive 'T' is a vertical stroke that extends slightly below the baseline, with a short horizontal stroke placed across the top. Keep the vertical line straight and the horizontal stroke even.
U: A Rounded Connection
The cursive 'U' is a connected curve that ends at the baseline. Practice maintaining consistent rounding throughout the letter.
V: The Angled Formation
The cursive 'V' is formed with two diagonal strokes that meet at a point. Keep the angles consistent and the connection smooth.
W: Double V Formation
The cursive 'W' is essentially a double 'V', connecting two 'V' shapes. Maintain consistent angles and spacing between the 'V' shapes.
X: Angled Intersection
The cursive 'X' forms an 'X' shape but uses a connected stroke. Pay attention to the consistency of the angles and the meeting point.
Y: A Combination Letter
The cursive 'Y' combines elements of the 'V' and 'I'. Practice making the upward stroke straight and the downward stroke angled consistently.
Z: A Zigzag Connection
The cursive 'Z' resembles a zigzag line. Focus on making the angles sharp and maintaining consistent slopes.
Practicing and Perfecting Your Cursive Writing
Consistent practice is crucial to mastering cursive writing. Here are some tips for effective practice:
- Start slowly: Focus on accuracy over speed, especially when learning new letters.
- Use guide sheets: Many workbooks offer guide sheets with dotted lines to help you practice the proper letter formations.
- Practice connecting letters: Once you're comfortable writing individual letters, focus on smoothly connecting them together.
- Write sentences: Practice writing sentences to improve your fluency and develop a rhythm.
- Use different writing tools: Experiment with different pens and pencils to find what feels most comfortable.
- Regular practice: Even a short amount of daily practice will improve your cursive skills over time.
- Analyze your handwriting: Regularly examine your writing to identify areas for improvement.
Beyond the Basics: Exploring Different Cursive Styles
While this guide covers the fundamental forms of cursive letters, it's important to note that there are many different cursive styles, each with its own nuances and characteristics. Exploring different styles can help you discover your own unique cursive voice. Experiment with variations in letter slant, loop size, and connection styles to find what best suits your preferences and writing style.
The Enduring Value of Cursive Writing in the Digital Age
In a world dominated by keyboards and touchscreens, the skill of cursive writing may seem outdated. However, the benefits of cursive writing extend beyond simple functionality. It fosters creativity, develops fine motor skills, improves cognitive functions, and provides a unique form of personal expression. The act of writing in cursive can be meditative and therapeutic. It allows for a deeper connection to the written word, resulting in improved memory and comprehension.
Mastering cursive writing is a journey, not a destination. With consistent practice and attention to detail, you can develop a beautiful and efficient script that will serve you well for years to come. Embrace the process, enjoy the journey, and revel in the unique artistic expression of your own cursive handwriting.
Latest Posts
Latest Posts
-
What Is The Lcm Of 5 And 10
Apr 02, 2025
-
Air Moves From High To Low Pressure
Apr 02, 2025
-
The Smallest Particle Of An Element Is A N
Apr 02, 2025
-
How Many Neutrons Does A Hydrogen Atom Have
Apr 02, 2025
-
What Is Nickel Used For In Everyday Life
Apr 02, 2025
Related Post
Thank you for visiting our website which covers about A To Z In Cursive Writing . We hope the information provided has been useful to you. Feel free to contact us if you have any questions or need further assistance. See you next time and don't miss to bookmark.
