Cursive Writing From A To Z
Juapaving
Mar 15, 2025 · 8 min read
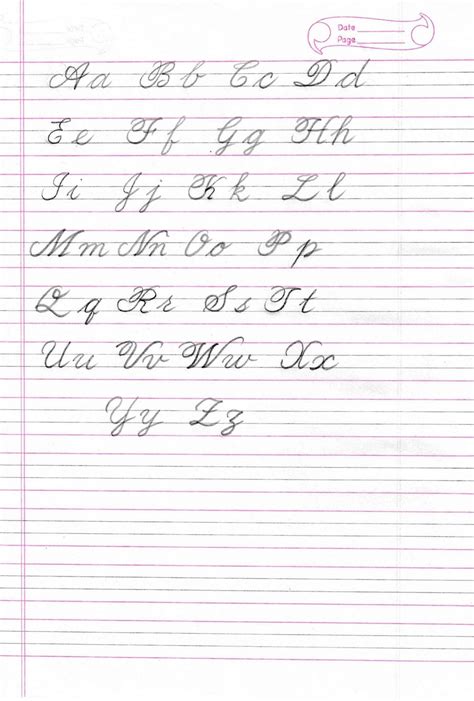
Table of Contents
Cursive Writing From A to Z: A Comprehensive Guide
Cursive writing, also known as script, is a style of penmanship where letters are connected. While its prevalence has decreased in recent years with the rise of digital technologies, understanding and practicing cursive remains a valuable skill with cognitive and aesthetic benefits. This comprehensive guide will take you from the absolute basics to more advanced techniques, covering everything you need to know about cursive writing from A to Z.
Understanding the Fundamentals of Cursive
Before diving into the individual letters, let's establish a strong foundation. Proper posture, grip, and paper placement are crucial for comfortable and effective cursive writing.
Posture and Grip
Posture: Sit upright with your back straight, feet flat on the floor. Good posture prevents strain and promotes clear writing.
Grip: Hold your pen or pencil lightly between your thumb and index finger, resting it on your middle finger. Avoid gripping too tightly, which can lead to hand cramps and fatigue. Imagine you're holding a small bird – firm enough to keep it secure, but gentle enough to avoid hurting it.
Paper Placement
Angle your paper slightly to the left (if you're right-handed) or to the right (if you're left-handed). This allows your hand to move smoothly across the page without obstructing your view.
Mastering the Basic Strokes
Cursive writing relies on a series of fundamental strokes. Practice these diligently, as they form the building blocks of every letter.
The Oval:
The oval is a foundational stroke used in many lowercase letters like a, d, g, and o. Practice making smooth, consistent ovals, both clockwise and counter-clockwise. Pay attention to the consistency of your pressure and the smoothness of your lines.
The Undercurve:
The undercurve is a gentle curve that forms the base of many letters. It's a crucial element in letters such as c, u, v, and w. Practice connecting undercurves seamlessly to create flowing lines.
The Overcurve:
The overcurve is the opposite of the undercurve, forming the top of letters like n, m, and h. Mastering the overcurve ensures your letters maintain a consistent height and shape.
The Straight Line:
Although seemingly simple, the straight line is essential for letters like i, u, and parts of many others. Practice making straight lines with consistent pressure and height.
The Combination of Strokes:
Once you feel comfortable with each individual stroke, practice combining them. For example, practice connecting an overcurve to an undercurve, or an oval to a straight line. This will prepare you for writing more complex letters.
Learning the Alphabet in Cursive
Now, let's delve into the individual letters, starting with lowercase and then moving on to uppercase. Remember to focus on maintaining consistent letter height, spacing, and connecting strokes smoothly.
Lowercase Letters:
- a: Start with a small loop, then a gentle curve up and around to form the bowl of the 'a'. Connect it to the next letter smoothly.
- b: Start with a vertical line, then a loop that connects back to the vertical line, before finishing with a gentle curve.
- c: A simple undercurve.
- d: Similar to 'a' but taller, with the loop extending below the baseline.
- e: A simple oval with a diagonal line closing it and often a small tail.
- f: Begin with a vertical line that extends above the baseline, then an undercurve.
- g: Begins with a loop going under the baseline, loops up and connects to a small curve before exiting.
- h: An overcurve followed by a vertical line.
- i: A vertical line with a small dot above.
- j: A tall, narrow loop with a dot above.
- k: An upward curve, followed by a downward curve, often connecting to the baseline.
- l: A simple vertical line.
- m: Two overcurves followed by a small undercurve.
- n: An overcurve followed by a smaller undercurve.
- o: A simple oval.
- p: Start with an upright oval which should be linked smoothly to a loop below the baseline.
- q: Similar to 'p', but with a hook extending below the baseline and connected at the bottom.
- r: Begin with a vertical line, loop upward before making a slight undercurve.
- s: Start with a small overcurve, before making a bigger undercurve.
- t: A vertical line with a crossbar.
- u: Two undercurves connected.
- v: Two undercurves connected, but more sharply angled.
- w: Three undercurves connected.
- x: Two diagonal lines that cross in the middle.
- y: Start with a small loop that goes above the baseline, extend to the baseline, then make a small upward curve at the end.
- z: An undercurve and a diagonal line.
Uppercase Letters:
- A: Two diagonals connected at the top, with a crossbar.
- B: An upper loop connecting to a lower loop.
- C: A large, uppercase ‘c’ shape.
- D: A large oval that connects back on itself.
- E: A vertical line with three horizontal strokes.
- F: Similar to lowercase ‘f’ but larger.
- G: Similar to lowercase ‘g’, but larger.
- H: Two vertical lines connected by a horizontal stroke.
- I: A long vertical line.
- J: Starts with a tall vertical stroke, then curves around at the end.
- K: Similar to lowercase ‘k’ but larger.
- L: A long vertical line.
- M: Two large overcurves, connected to one undercurve.
- N: A large overcurve followed by a large undercurve.
- O: A large, uppercase oval.
- P: Starts with a large loop above the baseline, descends and curves back at the bottom.
- Q: Starts like a ‘P’, but tails down and loops back under the baseline.
- R: Starts like a ‘P’, but finishes with a small upward stroke at the end.
- S: Starts with a large upward stroke, loops to the bottom and finishes with a small curved line.
- T: A long horizontal stroke with a vertical stroke down from the middle.
- U: Two large undercurves joined.
- V: Two large undercurves joined, with a sharper angle.
- W: Three large undercurves joined.
- X: Two large diagonal lines that cross in the middle.
- Y: Starts with a large upward stroke, loops downward at the baseline, then a short line connecting to it.
- Z: A large undercurve connected to a diagonal line.
Practicing and Improving Your Cursive
Consistent practice is key to improving your cursive writing. Start with simple exercises, gradually increasing the complexity of the words and sentences you write.
Practice Drills:
- Stroke practice: Spend time practicing the basic strokes repeatedly. Focus on consistency in shape, size, and pressure.
- Letter practice: Practice writing each letter individually, paying attention to the details of its construction.
- Word practice: Once you're comfortable with the individual letters, move on to writing simple words. Focus on connecting the letters smoothly.
- Sentence practice: Write short, simple sentences, gradually increasing the length and complexity of the sentences.
- Copywork: Copying passages from books or articles is an excellent way to improve your fluency and consistency.
Tips for Improvement:
- Use lined paper: This will help you maintain consistent letter height and spacing.
- Write slowly at first: Focus on accuracy rather than speed. As your skills improve, you can gradually increase your speed.
- Take breaks: Avoid writing for extended periods without breaks. This will prevent fatigue and maintain accuracy.
- Review your work: Regularly review your work to identify areas for improvement.
- Seek feedback: Ask others to review your writing and provide constructive criticism.
Beyond the Basics: Advanced Techniques and Styles
Once you have mastered the fundamentals, you can explore more advanced techniques and styles of cursive writing.
Different Cursive Styles:
There are many variations in cursive writing styles. Exploring different styles can broaden your skills and provide aesthetic variety. Research and experiment with various styles, such as italic cursive, Spencerian script, or other historical styles to discover what resonates best with you.
Flourishes and embellishments:
Adding flourishes and embellishments can enhance the aesthetic appeal of your writing, giving it a unique and personalized touch. Start with simple embellishments and gradually increase complexity as you gain experience. However, remember that readability should always be prioritized.
Connecting Words and Sentences:
Smoothly connecting words and sentences is an important aspect of cursive writing. Focus on maintaining a consistent flow, avoiding abrupt stops and starts. Practice joining letters and words naturally, creating a rhythmic and harmonious flow across the page.
The Benefits of Cursive Writing
Despite the digital age, cursive writing offers numerous benefits:
- Improved cognitive skills: Studies show that cursive writing enhances brain development and cognitive function.
- Enhanced fine motor skills: Cursive writing requires precise hand-eye coordination and fine motor control.
- Increased creativity: Cursive writing allows for greater expression and creativity through personalized styles.
- Improved memory retention: The act of writing can improve memory recall.
- Personal expression: Cursive writing is a form of self-expression; it allows for personality to shine through.
Conclusion: Embrace the Art of Cursive
Mastering cursive writing is a rewarding journey that extends beyond mere penmanship. It's a skill that cultivates cognitive function, fine motor skills, and creativity. By dedicating time and effort to practicing the fundamentals and exploring advanced techniques, you can unlock the beauty and benefits of this timeless art form. So grab a pen and paper, and start your cursive journey today! The journey from A to Z, and beyond, is well worth the effort.
Latest Posts
Latest Posts
-
Least Common Multiple Of 5 6 7
Mar 17, 2025
-
How Do You Find The Inverse Of A Relation
Mar 17, 2025
-
Does Cold Air Go Up Or Down
Mar 17, 2025
-
Least Common Multiple Of 20 And 3
Mar 17, 2025
-
Function Of The Motor End Plate
Mar 17, 2025
Related Post
Thank you for visiting our website which covers about Cursive Writing From A To Z . We hope the information provided has been useful to you. Feel free to contact us if you have any questions or need further assistance. See you next time and don't miss to bookmark.
