Ray Diagrams Of A Concave Mirror
Juapaving
Mar 28, 2025 · 6 min read
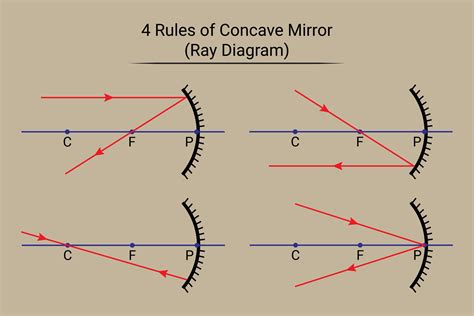
Table of Contents
Ray Diagrams of a Concave Mirror: A Comprehensive Guide
Concave mirrors, also known as converging mirrors, are a fundamental part of the study of optics. Understanding how light interacts with these curved reflectors is crucial for comprehending a wide range of optical instruments, from telescopes to microscopes and even car headlights. This comprehensive guide will delve into the intricacies of drawing accurate ray diagrams for concave mirrors, covering various scenarios and explaining the underlying principles. We'll explore different image formations, including real and virtual images, and how to determine their characteristics (size, orientation, and location) directly from the diagram.
Understanding the Basics: Terminology and Principles
Before we dive into constructing ray diagrams, let's establish a firm understanding of some key terms and principles:
-
Concave Mirror: A mirror with a reflecting surface that curves inwards, like the inside of a sphere. The curve creates a focal point where parallel rays of light converge.
-
Principal Axis: An imaginary line passing through the center of curvature (C) and the vertex (V) of the mirror.
-
Center of Curvature (C): The center of the sphere from which the concave mirror is a part.
-
Vertex (V): The point where the principal axis intersects the mirror's surface.
-
Focal Point (F): The point on the principal axis where parallel rays of light converge after reflecting off the concave mirror. The distance from the vertex (V) to the focal point (F) is the focal length (f). For a spherical concave mirror, the focal length is approximately half the radius of curvature (f ≈ R/2).
-
Radius of Curvature (R): The distance from the center of curvature (C) to the vertex (V).
-
Object Distance (u): The distance between the object and the mirror's vertex (V). It's considered negative according to the sign convention.
-
Image Distance (v): The distance between the image and the mirror's vertex (V). It's positive for real images and negative for virtual images.
-
Real Image: An image formed by the actual convergence of light rays. It can be projected onto a screen.
-
Virtual Image: An image formed by the apparent convergence of light rays. It cannot be projected onto a screen.
Drawing Ray Diagrams: The Three Fundamental Rays
To construct an accurate ray diagram for a concave mirror, we utilize three principal rays:
1. The Parallel Ray: A ray parallel to the principal axis reflects through the focal point (F).
2. The Focal Ray: A ray passing through the focal point (F) reflects parallel to the principal axis.
3. The Center Ray: A ray passing through the center of curvature (C) reflects back along the same path.
Different Scenarios and Image Formation
Let's explore various scenarios by systematically changing the object's position relative to the concave mirror and observing the resulting image characteristics. Remember, we'll be using the three fundamental rays described above to construct our diagrams.
Scenario 1: Object at Infinity
When the object is placed at infinity (very far away from the mirror), parallel rays strike the mirror. These rays reflect through the focal point (F).
- Image Characteristics: The image formed is real, inverted, highly diminished, and located at the focal point (F).
Scenario 2: Object Beyond the Center of Curvature (u > R)
When the object is placed beyond the center of curvature (C), the image will be:
- Image Characteristics: The image is real, inverted, diminished, and located between the focal point (F) and the center of curvature (C).
Scenario 3: Object at the Center of Curvature (u = R)
When the object is placed at the center of curvature (C), the rays reflected from the mirror converge at a point which coincides with the object itself.
- Image Characteristics: The image formed is real, inverted, and of the same size as the object. It's located at the center of curvature (C).
Scenario 4: Object Between the Center of Curvature and the Focal Point (R > u > f)
Placing the object between the center of curvature (C) and the focal point (F) yields:
- Image Characteristics: The image is real, inverted, and magnified. It is located beyond the center of curvature (C).
Scenario 5: Object at the Focal Point (u = f)
When the object is placed at the focal point (F), the reflected rays become parallel and never converge.
- Image Characteristics: No image is formed.
Scenario 6: Object Between the Focal Point and the Mirror (u < f)
Positioning the object between the focal point (F) and the mirror produces:
- Image Characteristics: The image is virtual, erect, and magnified. It's located behind the mirror. This is the type of image seen in a magnifying glass or a shaving mirror when it is placed very close to the face.
Sign Convention for Concave Mirrors
To accurately determine the image characteristics using calculations (mirror formula and magnification formula), a consistent sign convention is essential. Here's a widely accepted convention:
- Object distance (u) is always negative.
- Image distance (v) is positive for real images and negative for virtual images.
- Focal length (f) is positive for concave mirrors.
- Height of the object (h) is always positive.
- Height of the image (h') is positive for erect images and negative for inverted images.
The Mirror Formula and Magnification
The mirror formula and magnification formula help quantitatively describe image formation in concave mirrors:
-
Mirror Formula: 1/f = 1/v + 1/u
-
Magnification (M): M = -v/u = h'/h
Where:
- f is the focal length
- v is the image distance
- u is the object distance
- h is the object height
- h' is the image height
These formulas, coupled with the ray diagram, provide a complete understanding of the image formation process. The sign convention is crucial for correctly applying these formulas.
Applications of Concave Mirrors
Concave mirrors find widespread applications due to their ability to form real and magnified images. Some notable examples include:
- Telescopes: Used to collect and focus light from distant celestial objects.
- Microscopes: Used to magnify small objects for detailed observation.
- Headlights and Reflectors: Used to focus light into a beam.
- Solar Furnaces: Used to concentrate sunlight to generate high temperatures.
- Shaving Mirrors: Provide magnified images for close-up viewing.
Advanced Considerations and Limitations
While the three fundamental rays provide an excellent approximation for image formation, it's important to acknowledge some limitations:
- Paraxial Rays: The ray diagram method works best with paraxial rays – rays that are close to the principal axis. Rays far from the axis can lead to aberrations (distortions) in the image.
- Spherical Aberration: This aberration occurs when parallel rays far from the principal axis do not converge at a single point, resulting in a blurred image. It can be minimized by using parabolic mirrors.
Conclusion
Mastering the art of drawing ray diagrams for concave mirrors is a cornerstone of understanding geometric optics. By understanding the three fundamental rays and their behavior under different object positions, along with the appropriate sign convention and formulas, one can accurately predict the characteristics of the formed images. This knowledge is not only crucial for academic purposes but also serves as a foundation for appreciating the diverse applications of concave mirrors in various technological and scientific fields. Remember to practice drawing various scenarios and comparing your diagrams with the descriptions provided here to reinforce your understanding. The more you practice, the more intuitive this process becomes.
Latest Posts
Latest Posts
-
A Piece Of Land Surrounded By Water On Three Sides
Mar 31, 2025
-
How Far Is 20 Kilometers In Miles
Mar 31, 2025
-
How To Find The Perimeter Of Semicircle
Mar 31, 2025
-
What Is The Least Common Multiple Of 11 And 2
Mar 31, 2025
-
How Do You Calculate The Percent Abundance Of An Isotope
Mar 31, 2025
Related Post
Thank you for visiting our website which covers about Ray Diagrams Of A Concave Mirror . We hope the information provided has been useful to you. Feel free to contact us if you have any questions or need further assistance. See you next time and don't miss to bookmark.
