A Diagram Of A Compound Microscope
Juapaving
Mar 19, 2025 · 6 min read
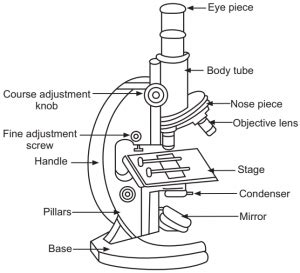
Table of Contents
A Deep Dive into the Compound Microscope: Understanding its Diagram and Function
The compound microscope, a cornerstone of biological and materials science, allows us to visualize the intricate details of the microscopic world, revealing structures invisible to the naked eye. Understanding its components and their arrangement is crucial for effective microscopy. This comprehensive guide will dissect the compound microscope's diagram, explaining the function of each part and how they work together to magnify specimens.
The Anatomy of a Compound Microscope: A Detailed Diagram
A typical compound microscope comprises several key components, each playing a vital role in image formation and observation. Let's explore these components through a virtual dissection of its diagram:
I. The Optical System:
-
1. Eyepiece (Ocular Lens): Located at the top of the microscope, the eyepiece is the lens closest to the observer's eye. It further magnifies the image produced by the objective lens, typically providing 10x magnification. Understanding the eyepiece's role is critical; it's not just magnifying, but it's refining the final image you see. Different eyepieces offer varying magnification, allowing for customization of the total magnification.
-
2. Objective Lenses: Situated on the revolving nosepiece (turret), these lenses are the primary magnifying components. A typical compound microscope features several objective lenses, each with a different magnification power (e.g., 4x, 10x, 40x, 100x). The 100x objective, often called the oil immersion lens, requires immersion oil for optimal resolution. The higher the magnification, the finer the details visible. Selecting the appropriate objective lens is crucial for achieving the desired level of magnification and detail.
-
3. Revolving Nosepiece (Turret): This rotating mechanism holds the objective lenses, allowing for easy switching between different magnification levels. Proper use of the nosepiece is essential to avoid damaging the lenses or the specimen. Always rotate it gently and smoothly.
II. The Illumination System:
-
4. Light Source: This component provides the illumination needed to view the specimen. Modern microscopes often use LED lights for their brightness, energy efficiency, and long lifespan. Adjusting the light intensity is crucial for optimal viewing; too much light can wash out the image, while too little can make it difficult to see details.
-
5. Condenser: Located beneath the stage, the condenser focuses the light onto the specimen. It contains an adjustable diaphragm that controls the amount of light passing through the specimen, affecting contrast and resolution. Proper adjustment of the condenser is vital for achieving sharp, well-contrasted images. A closed diaphragm increases contrast, while an open diaphragm increases brightness but may reduce contrast.
-
6. Iris Diaphragm: This adjustable diaphragm within the condenser controls the angle of light entering the condenser. Correct diaphragm adjustment is crucial for resolving fine details and achieving optimal contrast. It's a key element in achieving the best possible image quality.
III. The Mechanical System:
-
7. Stage: The flat platform upon which the microscope slide containing the specimen is placed. The stage often includes clips to securely hold the slide in place. Some advanced microscopes have mechanical stages that allow for precise movement of the slide using control knobs.
-
8. Mechanical Stage Knobs (X-Y Adjustment): These knobs allow for precise movement of the stage, facilitating accurate positioning of the specimen under the objective lens. Precise movement is vital for navigating across the specimen and locating specific areas of interest.
-
9. Coarse Focus Knob: This larger knob moves the stage up and down in larger increments, used for initial focusing at lower magnifications. Use the coarse focus carefully, especially at high magnifications, to avoid damaging the objective lens or the slide.
-
10. Fine Focus Knob: This smaller knob provides finer adjustments to the stage, used for sharp focusing at higher magnifications. The fine focus knob is crucial for achieving optimal sharpness and resolving fine details in your specimen.
-
11. Arm: The sturdy vertical structure that connects the base to the optical tube and stage. The arm is important for carrying and supporting the microscope. Always grasp the arm when moving or transporting the microscope.
-
12. Base: The bottom, supportive part of the microscope, providing stability. The base ensures the microscope remains stable during use.
Understanding the Magnification Process: How the Compound Microscope Works
The compound microscope's ability to magnify specimens stems from the combined magnifying power of its objective and eyepiece lenses. Total magnification is calculated by multiplying the magnification of the objective lens by the magnification of the eyepiece lens. For instance, a 10x eyepiece and a 40x objective lens produce a total magnification of 400x (10 x 40 = 400).
The process involves several steps:
-
Light Source: The light source illuminates the specimen, passing through the condenser.
-
Condenser and Diaphragm: The condenser focuses the light onto the specimen, and the diaphragm controls the amount of light and contrast.
-
Objective Lens: The objective lens collects the light passing through the specimen and forms a magnified, real, and inverted image. The objective lens's magnification determines the initial level of enlargement.
-
Eyepiece Lens: This lens further magnifies the image created by the objective lens, resulting in a larger, virtual, and inverted image observed by the user. The eyepiece enhances the already magnified image for viewing.
-
Image Formation: The final image seen through the eyepiece is a magnified, inverted, and virtual image of the specimen.
Troubleshooting Common Issues: Optimizing Your Microscope's Performance
Even with a thorough understanding of the microscope's components, you might encounter some issues. Here are some common problems and solutions:
-
Blurry Image: This could be due to incorrect focusing (use the coarse and fine focus knobs). Ensure the condenser is correctly adjusted and the diaphragm is appropriately set for optimal contrast and light. Check for any dust or debris on the lenses and clean them gently.
-
Poor Contrast: Adjust the condenser and iris diaphragm. A closed diaphragm increases contrast, while an open diaphragm increases brightness.
-
Dark Image: Check the light source and ensure it's turned on and functioning correctly. Adjust the brightness and the condenser height.
-
Specimen Not Centered: Use the mechanical stage knobs (X-Y adjustment) to precisely move the stage and center the specimen.
-
Oil Immersion Issues: When using the oil immersion lens (100x), ensure a drop of immersion oil is placed between the lens and the slide. Using too much or too little oil can severely impact image quality.
Beyond the Basics: Advanced Compound Microscope Techniques
While this guide covers the fundamental aspects of a compound microscope, several advanced techniques enhance its capabilities:
-
Brightfield Microscopy: The most common technique, using transmitted light to illuminate the specimen.
-
Darkfield Microscopy: Uses a special condenser to illuminate the specimen from the sides, creating a dark background with bright objects. This technique is useful for visualizing transparent specimens.
-
Phase-Contrast Microscopy: Enhances contrast in transparent specimens by manipulating the phase of light waves.
-
Fluorescence Microscopy: Uses fluorescent dyes to label specific structures within the specimen, allowing for high-contrast visualization of targeted components.
Understanding these techniques significantly broadens the application of the compound microscope.
Conclusion: Mastering the Compound Microscope for Enhanced Scientific Exploration
The compound microscope is an invaluable tool in various scientific disciplines. By understanding its diagram and the function of each component, users can effectively operate and maintain the microscope, optimizing image quality and achieving precise observations. This comprehensive guide provides a detailed overview of the compound microscope, equipping users with the necessary knowledge to explore the microscopic world with confidence and precision. Mastering the techniques described here will significantly enhance your ability to perform detailed microscopic observations and contribute to successful scientific investigations. Remember, practice and familiarity are key to unlocking the full potential of this powerful scientific instrument.
Latest Posts
Latest Posts
-
Words That End With A S
May 09, 2025
-
25 Is 50 Of What Number
May 09, 2025
-
What Is 9 Percent In Decimal Form
May 09, 2025
-
5 Letter Word Containing S And I
May 09, 2025
-
Difference Between Experimental Probability And Theoretical Probability
May 09, 2025
Related Post
Thank you for visiting our website which covers about A Diagram Of A Compound Microscope . We hope the information provided has been useful to you. Feel free to contact us if you have any questions or need further assistance. See you next time and don't miss to bookmark.